Food preservation changed my kitchen routine forever. Last summer, my garden produced more tomatoes than my family could eat in a month. Instead of watching them rot, I learned to can them. Now, we enjoy garden-fresh tomato sauce all winter long. That experience taught me how food preservation can save money, reduce waste, and provide better nutrition year-round.
Food preservation keeps food safe to eat for longer periods. Food preservation involves slowing down or stopping the natural processes that cause food to spoil, such as oxidation, bacterial growth, and enzymatic activity. Learning these methods helps you make the most of seasonal produce, bulk purchases, and leftovers.
Why Food Preservation Matters
Food preservation offers several benefits for home cooks:
Save Money: Buying produce in season costs less. Preserving it lets you enjoy these savings all year.
Reduce Waste: Americans throw away about 30% of their food. Proper preservation cuts this waste significantly.
Better Nutrition: Home-preserved foods often contain fewer additives than store-bought versions.
Emergency Preparedness: A well-stocked pantry provides security during emergencies or supply chain issues.
Taste Quality: Preserving food at peak ripeness captures the best flavors.
Convenience: Having preserved meals ready saves time during busy weeks.
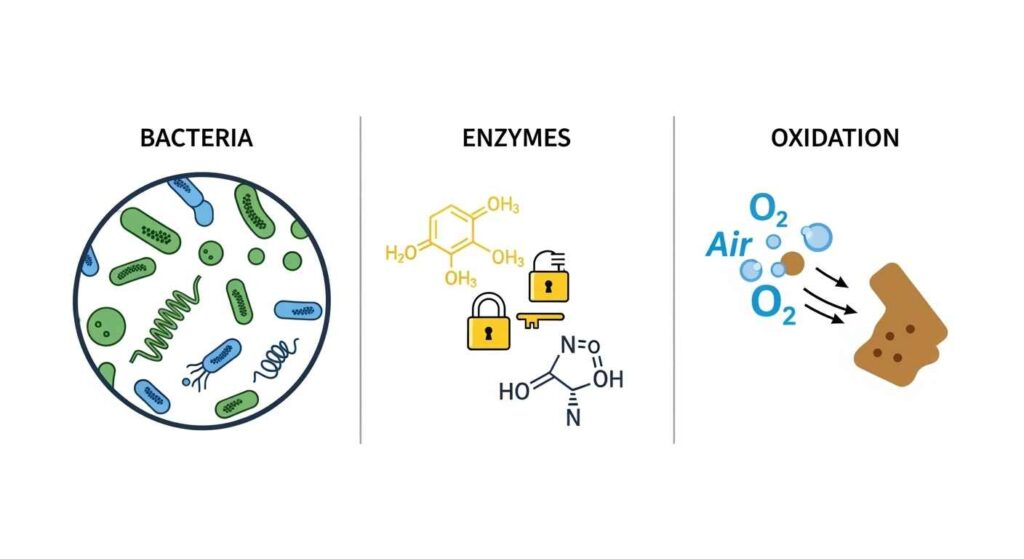
Understanding Food Spoilage
Before learning preservation methods, understand why food spoils. Three main factors cause food to go bad:
Bacteria and Microorganisms: These multiply in warm, moist environments. Some bacteria can cause serious illness.
Enzymes: Natural chemicals in food that continue breaking down cell walls after harvest.
Oxidation: Air exposure causes color changes, nutrient loss, and off-flavors.
All preservation methods work by controlling one or more of these factors.
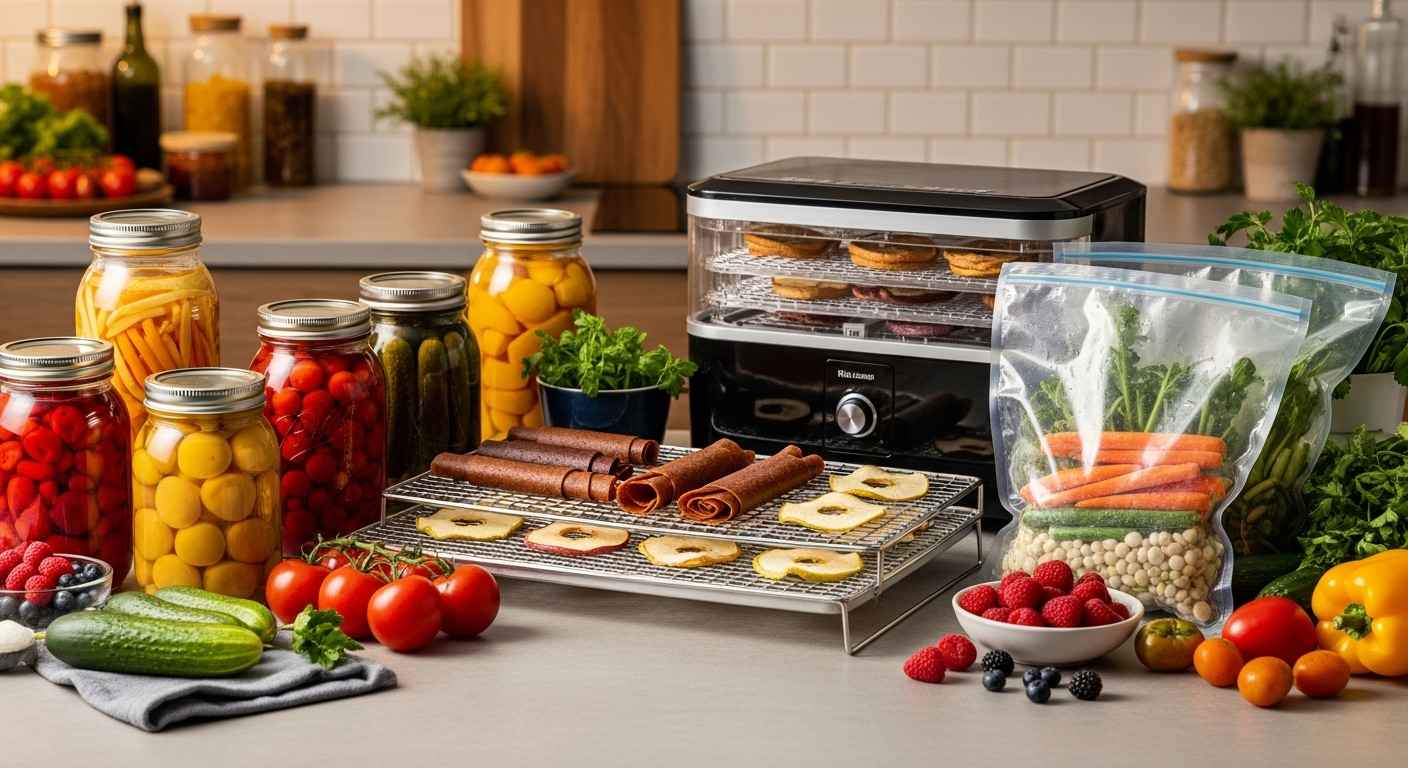
Essential Food Preservation Methods
1. Freezing: The Easiest Method for Beginners
Freezing stops bacterial growth and slows enzyme activity. Most foods can be frozen, making this the most versatile preservation method.
Best Foods for Freezing:
- Fresh fruits and vegetables
- Cooked meals and leftovers
- Raw and cooked meats
- Bread and baked goods
- Soups and stews
Freezing Steps:
- Cool cooked foods completely before freezing
- Use freezer-safe containers or bags
- Remove as much air as possible to prevent freezer burn
- Label containers with contents and date
- Freeze at 0°F (-18°C) or below
Freezer Storage Times:
- Fruits and vegetables: 8-12 months
- Cooked meals: 2-6 months
- Raw meat: 4-12 months depending on type
- Bread: 2-3 months
Pro Tips:
- Blanch vegetables before freezing to maintain color and texture
- Freeze foods in meal-sized portions
- Use a permanent marker that won’t fade in cold temperatures
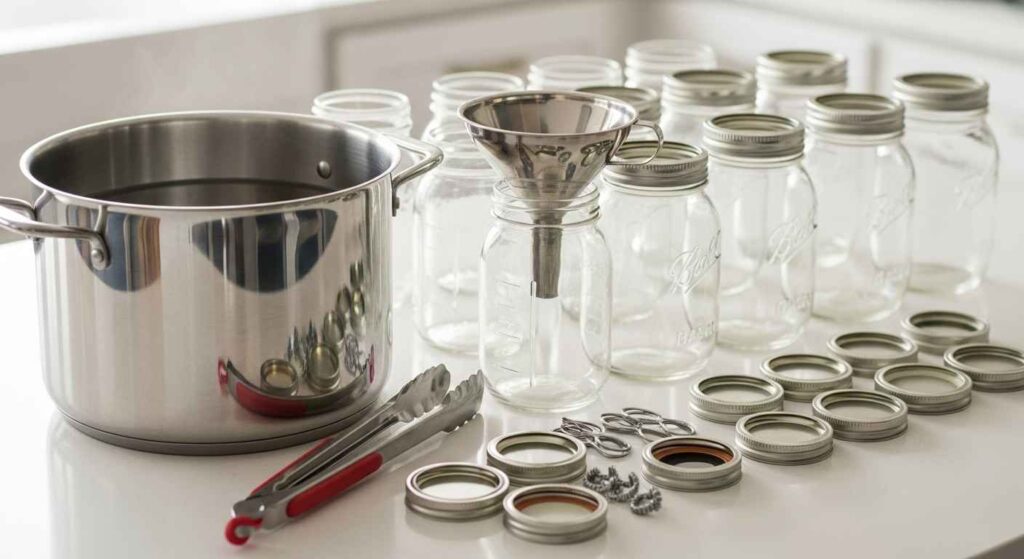
2. Water Bath Canning: Perfect for High-Acid Foods
Use this method for processing high-acid foods, such as fruit, items made from fruit, pickles, pickled food, and tomatoes. Water bath canning uses boiling water to kill harmful bacteria in acidic foods.
Equipment Needed:
- Large pot with lid
- Canning jars with new lids
- Jar lifter or tongs
- Canning funnel (helpful but not required)
Safe Foods for Water Bath Canning:
- Fruit jams and jellies
- Pickles and relishes
- Tomatoes (with added acid)
- Fruit preserves
- Salsa (tested recipes only)
Basic Canning Process:
- Sterilize jars in boiling water for 10 minutes
- Prepare food according to tested recipe
- Fill hot jars, leaving proper headspace
- Wipe jar rims clean
- Apply lids and rings finger-tight
- Process in boiling water for recipe time
- Cool jars undisturbed for 12-24 hours
- Check for proper seal before storing
Safety Warning: When canning food at home as a beginner it’s important to know about botulism. It’s is a rare but serious illness caused by a germ called Clostridium botulinum. Always follow tested recipes from trusted sources like the USDA or National Center for Home Food Preservation.
3. Pressure Canning: For Low-Acid Foods
Pressure canning reaches higher temperatures needed to safely preserve low-acid foods like vegetables, meats, and meals.
Equipment Required:
- Pressure canner (not pressure cooker)
- Canning jars and lids
- Accurate pressure gauge
Foods Requiring Pressure Canning:
- Green beans and most vegetables
- Meat and poultry
- Seafood
- Complete meals like stews
- Beans and legumes
Process Overview:
- Follow tested recipes exactly
- Load jars into pressure canner with water
- Vent steam for 10 minutes
- Apply weighted gauge or watch dial gauge
- Maintain proper pressure for full processing time
- Cool naturally without removing weight
Important: Never attempt to pressure can without proper training. Take a class or follow resources from university extension services.
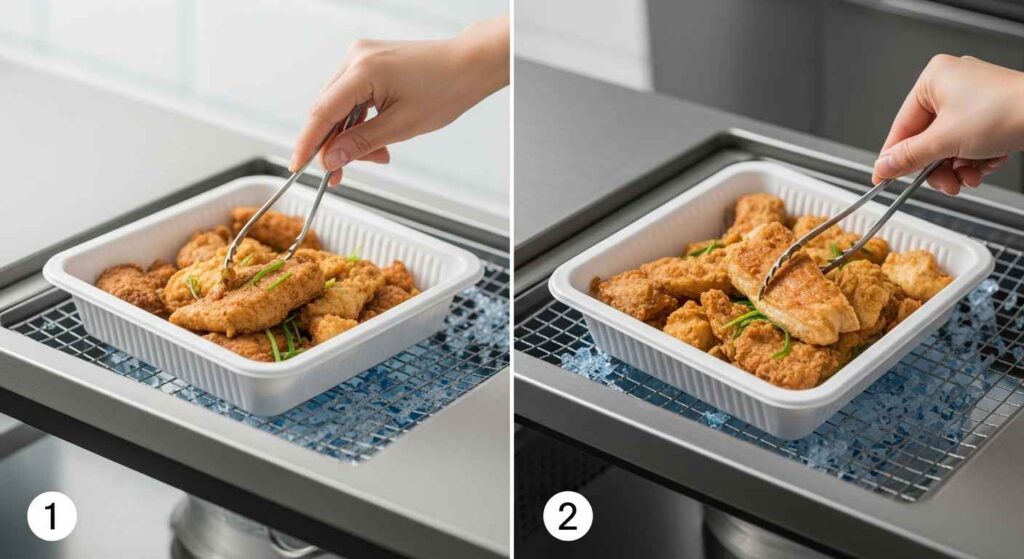
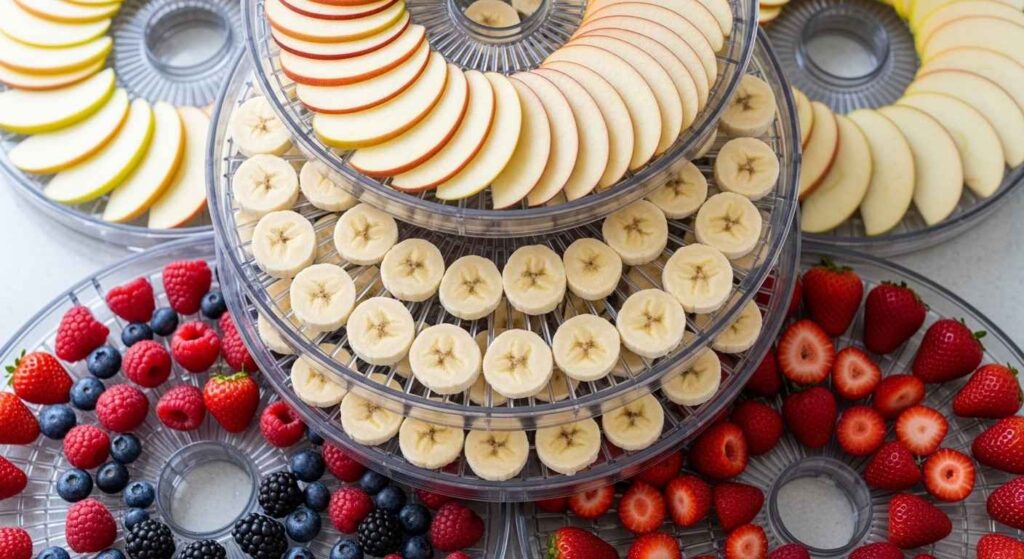
4. Dehydrating: Ancient Method Made Modern
Dehydrating removes moisture that bacteria need to grow. This method concentrates flavors and creates lightweight, shelf-stable foods.
Dehydrating Options:
- Electric dehydrator (most convenient)
- Oven on lowest setting with door cracked
- Air drying in dry climates
- Solar dehydrators
Best Foods to Dehydrate:
- Fruits: apples, bananas, berries, grapes
- Vegetables: tomatoes, peppers, mushrooms
- Herbs and spices
- Meat for jerky
- Leather from fruit purees
Preparation Steps:
- Slice foods evenly for uniform drying
- Pre-treat fruits with lemon juice or ascorbic acid
- Arrange on dehydrator trays without touching
- Dry at recommended temperature (usually 135°F for fruits, 125°F for vegetables)
- Store in airtight containers when completely dry
Storage Tips:
- Cool completely before storing
- Use vacuum-sealed bags for longest storage
- Add oxygen absorbers for extended shelf life
- Store in cool, dark places
5. Pickling: Quick and Flavorful Preservation
Pickling uses acid (vinegar) to create an environment where harmful bacteria cannot survive. This method works quickly and produces tangy, flavorful results.
Two Types of Pickling:
Quick Pickles (Refrigerator Pickles):
- Made with vinegar brine
- Stored in refrigerator
- Ready in hours or days
- Last 1-3 months refrigerated
Fermented Pickles:
- Use salt to encourage beneficial bacteria
- Take weeks to develop flavor
- Can be canned for shelf storage
- Traditional sauerkraut method
Basic Quick Pickle Brine:
- 1 cup vinegar (5% acidity)
- 1 cup water
- 1 tablespoon salt
- 1 tablespoon sugar
- Spices as desired
Pickling Process:
- Clean and prepare vegetables
- Pack into clean jars with spices
- Heat brine ingredients until salt dissolves
- Pour hot brine over vegetables
- Cool and refrigerate
- Wait 24 hours for best flavor
Popular pickled foods include cucumbers, onions, beets, and green beans.
6. Fermentation: Probiotic-Rich Preservation
Fermentation uses beneficial bacteria to preserve food while adding probiotics and complex flavors.
Common Fermented Foods:
- Sauerkraut and kimchi
- Fermented pickles
- Yogurt and kefir
- Sourdough starter
- Kombucha
Basic Sauerkraut Method:
- Shred cabbage finely
- Mix with salt (2% of cabbage weight)
- Pack tightly in jar, keeping below brine
- Ferment at room temperature 1-4 weeks
- Taste regularly and refrigerate when desired sourness reached
Safety Notes:
- Use proper salt ratios
- Keep vegetables below brine level
- Watch for signs of spoilage (bad odors, mold)
- Start with small batches
Food Safety Guidelines
Safe food preservation requires following basic guidelines:
Temperature Control:
- Refrigerate at 40°F (4°C) or below
- Freeze at 0°F (-18°C) or below
- Heat foods to proper temperatures during processing
Cleanliness:
- Wash hands, equipment, and work surfaces
- Use clean jars and utensils
- Don’t cross-contaminate raw and cooked foods
Tested Recipes:
- Follow recipes from trusted sources
- Don’t alter ingredient ratios in canned goods
- Measure ingredients accurately
When in Doubt, Throw it Out:
- Discard food that looks, smells, or tastes off
- Don’t taste questionable canned goods
- Watch for signs of spoilage
Getting Started: Your First Preservation Project
Choose one method to master before moving to others:
For Complete Beginners: Start with freezing. It requires minimal equipment and works with almost any food.
For Confident Cooks: Try quick pickling. Results come fast, and the process is forgiving.
For Garden Owners: Learn water bath canning for preserving abundant harvests.
Essential Equipment to Buy First:
- Good freezer containers or vacuum sealer
- Digital kitchen scale for accurate measurements
- Large pot for blanching vegetables
- pH strips for testing acidity (advanced users)
Internal links to consider: Many of our recipes work well for preservation. Try preserving components from our make-ahead breakfast burritos or preparing vegetables from our sheet pan chicken fajitas for later use.
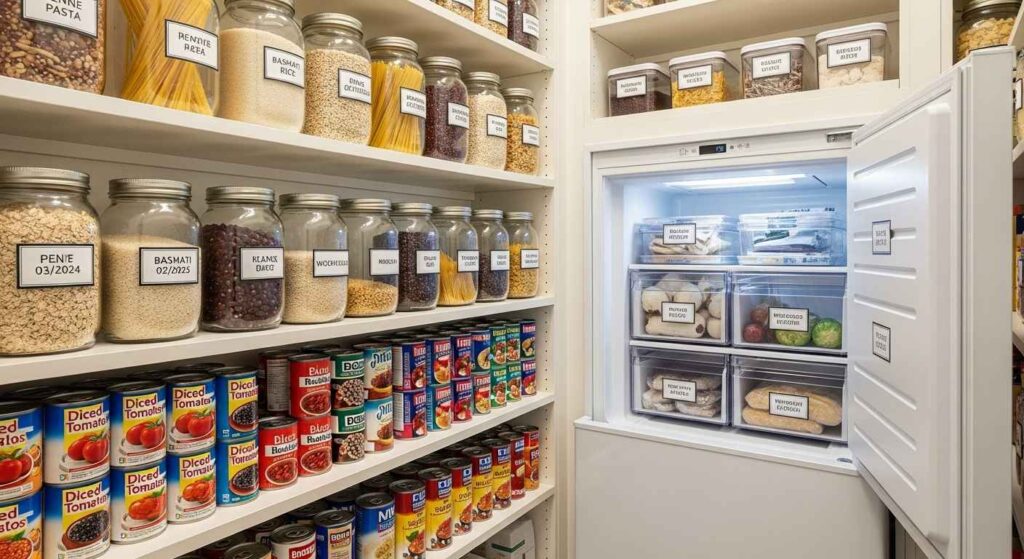
Storage and Organization Tips
Proper storage maintains quality and safety:
Labeling System:
- Include food name, date preserved, and method used
- Use waterproof labels for frozen items
- Rotate stock using oldest items first
Storage Locations:
- Cool, dark spaces for canned goods
- Consistent temperature areas
- Easy access for regular rotation
Inventory Management:
- Keep a list of preserved foods
- Note expiration dates
- Plan meals around preserved ingredients
For more storage ideas, check our 2-hour pantry organization guide and learn about storing fresh herbs.
Common Beginner Mistakes to Avoid
Learning from others’ mistakes saves time and ensures safety:
Mistake 1: Not Following Tested Recipes Solution: Stick to recipes from university extension services or USDA sources, especially for canning.
Mistake 2: Improper Storage Containers Solution: Invest in quality containers designed for your preservation method.
Mistake 3: Ignoring Temperature Requirements Solution: Use thermometers to verify temperatures during processing and storage.
Mistake 4: Overpacking Containers Solution: Leave appropriate headspace for expansion during freezing.
Mistake 5: Not Tracking Dates Solution: Label everything with preservation dates and use oldest items first.
Troubleshooting Common Problems
Problem: Freezer burn on frozen foods Solution: Remove more air from packages and use proper freezer containers.
Problem: Soft pickles Solution: Use fresh, firm vegetables and don’t over-process.
Problem: Jars not sealing during canning Solution: Check rim cleanliness, lid condition, and processing time.
Problem: Off flavors in preserved foods Solution: Follow tested recipes exactly and maintain proper storage conditions.
Advanced Techniques to Try Later
Once comfortable with basic methods, consider these options:
Vacuum Sealing: Removes air more effectively than other methods.
Sous Vide Preparation: Precise temperature control for consistent results.
Smoking: Adds flavor while preserving meats and fish.
Root Cellaring: Traditional storage for root vegetables and apples.
Freeze Drying: Freeze-drying is a low-temperature dehydration process that involves freezing food and removing the ice by sublimation—turning ice into vapor.
Building Your Preservation Pantry
Create a year-round supply of preserved foods:
Spring Projects:
- Preserve early vegetables like asparagus
- Make strawberry jam from first berries
- Start herb gardens for later preservation
Summer Focus:
- Can tomatoes and tomato products
- Freeze stone fruits and berries
- Make pickles from cucumber harvest
Fall Activities:
- Preserve apple harvest as sauce or dried
- Can soups and stews for winter
- Dehydrate herbs before frost
Winter Planning:
- Use preserved foods in meals
- Plan next year’s preservation goals
- Maintain and organize equipment
Recipe Adaptations for Preservation
Many regular recipes can be adapted for preservation:
Soups and Stews: Pressure can for shelf stability or freeze in portions.
Sauces: Can high-acid sauces or freeze in ice cube trays for easy portions.
Casseroles: Assemble and freeze before baking, or freeze leftovers.
Baked Goods: Many freeze well when properly wrapped.
Consider how recipes from our collection might work for preservation. Our best chili recipe freezes beautifully, and components from our slow cooker beef stew could be pressure canned.
Seasonal Preservation Calendar
Plan preservation activities around seasonal abundance:
January-February: Plan preservation goals, order seeds, maintain equipment
March-April: Start indoor herb gardens, preserve citrus fruits
May-June: Preserve strawberries, early greens, spring vegetables
July-August: Peak preservation season – tomatoes, stone fruits, summer vegetables
September-October: Apple preservation, late harvest vegetables, soup preparation
November-December: Use preserved foods, plan next year’s activities
Cost Analysis and Savings
Food preservation requires initial investment but provides long-term savings:
Initial Costs:
- Basic equipment: $50-200
- Jars and containers: $30-100
- Annual supplies (lids, labels): $20-50
Potential Savings:
- Seasonal produce buying: 30-50% savings
- Reduced food waste: $500-1500 annually per family
- Emergency food security: Priceless peace of mind
Break-Even Point: Most families see savings within 6-12 months of starting preservation activities.
Resources for Continued Learning
Trusted Sources:
- National Center for Home Food Preservation (NCHFP)
- University extension services
- USDA Complete Guide to Home Canning
- Local Master Food Preserver programs
Recommended Books:
- “Ball Complete Guide to Home Preserving”
- “So Easy to Preserve” by University of Georgia
- “Wild Fermentation” by Sandor Katz
Online Communities:
- Join local canning groups
- Follow reputable preservation blogs
- Attend workshops and classes
Visit: The National Center for Home Food Preservation provides science-based guidance for all preservation methods.
Conclusion
Food preservation transforms your relationship with food. You’ll save money, reduce waste, and enjoy better nutrition year-round. Start with one simple method like freezing or quick pickling. Master the basics before moving to more advanced techniques.
Remember that food safety comes first. Follow tested recipes, maintain proper temperatures, and trust your senses. When in doubt, don’t risk it.
Your preservation journey starts with a single jar of jam or a bag of frozen vegetables. Each success builds confidence for more ambitious projects. Soon, you’ll have a pantry full of delicious, home-preserved foods that connect you to seasons past and provide security for the future.
The key to success lies in starting small, learning continuously, and enjoying the process. Every preserved food represents time saved, money in the bank, and a step toward food security. Whether you’re preserving a single batch of pickles or planning a year’s worth of preserved foods, each effort makes a difference.
Take that first step today. Choose a preservation method that appeals to you, gather the basic equipment, and begin your food preservation adventure. Your future self will thank you for the delicious, nutritious, and economical foods waiting in your preservation pantry.
Ready to start preserving? Check out our food storage guides and leftover tips to maximize your food preservation success.
Prep Time: Varies by method (15 minutes to several hours) Processing Time: 10 minutes to 4 weeks depending on method Storage Time: 2 months to 2+ years when properly preserved Skill Level: Beginner to Advanced depending on method chosen